Setting Up Laravel 10 with Vue3 and Vuetify3
A complete guide to seamlessly integrating Vue3 and Vuetify3 into Laravel 10 using Vite.

Laravel has always evolved, keeping up with the changing landscape of web development. Up until Laravel 8, webpack was the bundler of choice. Starting from Laravel 9 onwards, Vite takes the spotlight, which has changed the setup process for Vue slightly. Let’s walk through the process of setting up Laravel 10 with Vite, Vue3, and Vuetify3.
Step 1: Install a New Laravel Project
Pre-requisites: Ensure PHP and Composer are installed on your local machine.
-
Installing Dependencies:
-
Install Node and NPM for managing JavaScript dependencies.
-
For those who have set up PHP and Composer through Laravel Valet, the Laravel installer will be readily available.
- Creating a Laravel Project:
. Using the Composer create-project command:
composer create-project laravel/laravel my-app
. Or, use the globally installed Laravel installer:
composer global require laravel/installerlaravel new my-app
- Vite Configuration: A new Laravel project will have a
vite.config.jsfile in its root, replacing the olderwebpack.mix.jsfile.
Default contents:
import { defineConfig } from "vite";import laravel from "laravel-vite-plugin";export default defineConfig({ plugins: [ laravel({ input: ["resources/css/app.css", "resources/js/app.js"], refresh: true, }), ],});
Step 2: Set Up Vue3
- Install Vue3 and Vue-loader:
npm install vue vue-loader
- Install Dependencies:
npm install
- Modify the App.js File:
Navigate to resources/js/app.js, and you will initially find:
import "./bootstrap";
Add Vue setup and create an app.vue file inside resources/js/layouts/app.vue for testing:
<template> <div> <h1>Hello world !!!</h1> </div></template>
Incorporate this within app.js:
import "./bootstrap";import { createApp } from "vue";import app from "./layouts/app.vue";createApp(app).mount("#app");
- Update Blade File:
In resources/views/welcome.blade.php, update the body content to include the Vue app:
<body> <div id="app"></div> @vite('resources/js/app.js')</body>
- Update Environment Variables:
Set APP_URL in the .env file:
APP_URL=http://127.0.0.1:8000
- Run the Development Servers:
Open two terminal windows:
- In the first, run:
php artisan serve - In the second, run:
npm run dev
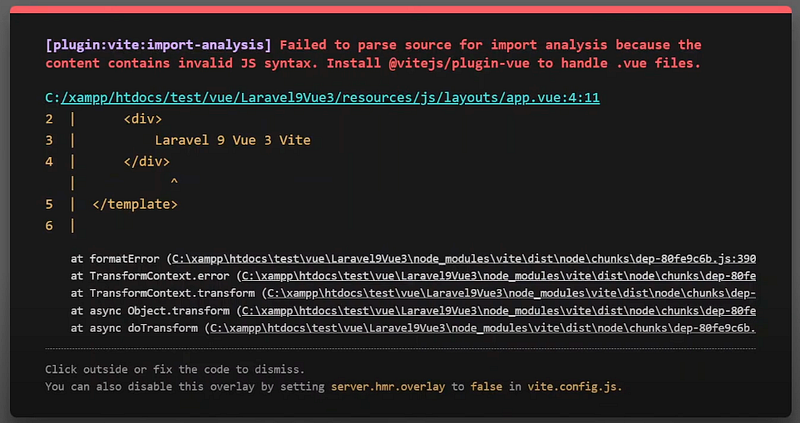
If errors arise regarding Vue file handling like this:

install vitejs/plugin-vue:
npm i @vitejs/plugin-vue
Update the vite.config.js to include the Vue plugin:
import vue from "@vitejs/plugin-vue";// inside the plugins array:vue(),
It will become like this:
import { defineConfig } from "vite";import laravel from "laravel-vite-plugin";import vue from "@vitejs/plugin-vue";export default defineConfig({ plugins: [ vue(), laravel({ input: ["resources/css/app.css", "resources/js/app.js"], refresh: true, }), ],});
Relaunch the development servers. If you’ve followed along, everything should be working fine. With Vite, you benefit from hot module reloading, which means changes appear instantly without a page refresh.
Step 3: Incorporate Vuetify3
- Install Vuetify3:
npm install vuetify
- Setup Vuetify Configuration:
Inside resources/js, create vuetify.js file (resources/js/vuetify.js)and populate it with Vuetify configuration and theming options, like this:
// Vuetifyimport "vuetify/styles";import { createVuetify } from "vuetify";import * as components from "vuetify/components";import * as directives from "vuetify/directives";const customeTheme = { dark: false, colors: { primary: "#673AB7", secondary: "#424242", accent: "#82B1FF", error: "#FF5252", info: "#2196F3", success: "#4CAF50", warning: "#FFC107", lightblue: "#14c6FF", yellow: "#FFCF00", pink: "#FF1976", orange: "#FF8657", magenta: "#C33AFC", darkblue: "#1E2D56", gray: "#909090", neutralgray: "#9BA6C1", green: "#2ED47A", red: "#FF5c4E", darkblueshade: "#308DC2", lightgray: "#BDBDBD", lightpink: "#FFCFE3", white: "#FFFFFF", muted: "#6c757d", },};const vuetify = createVuetify({ components, directives, theme: { defaultTheme: "customeTheme", themes: { customeTheme, }, },});export default vuetify;
- Integrate Vuetify into app.js:
Modify app.js to incorporate Vuetify:
import vuetify from "./vuetify";createApp(app).use(vuetify).mount("#app");
Testing Vuetify3 Integration
After you’ve completed the setup:
-
Run the Servers:
-
Use
php artisan serveto start the Laravel server. -
In another terminal window, use
npm run devto start the Vite server.
- Navigate to Your App:
Head over to the APP_URL where your Laravel app is running, e.g., [http://127.0.0.1:8000](http://127.0.0.1:8000.)
- Test Vuetify:
Inside app.vue, add the Vuetify button component:
<v-btn color="primary">Button</v-btn>
Save the file. With Vite’s hot module reloading, the changes should appear instantly on your page.
- Visual Confirmation:
Here’s how your screen should look after the changes:

And there you have it! Laravel 10 integrated seamlessly with Vite, Vue3, and Vuetify3. Happy coding!
Got a Product Idea?
I build MVPs, web apps, and SaaS platforms in 7 days. Fixed price, real code, deployed and ready to use.
⚡ Currently available for 2-3 new projects

About Hafiz
Full Stack Developer from Italy. I help founders turn ideas into working products fast. 9+ years of experience building web apps, mobile apps, and SaaS platforms.
View My Work →Get web development tips via email
Join 50+ developers • No spam • Unsubscribe anytime
Related Articles

Effortlessly Dockerize Your Laravel & Vue Application: A Step-by-Step Guide
Unleash the Full Potential of Laravel 10 with Vue 3 and Vuetify 3 in a Dockerize...

Laravel AI SDK Tutorial Part 2: Build a RAG-Powered Support Bot with Tools and Memory
Go beyond basic agents. Build a support bot that remembers users, searches your...

Stop Vibe Coding Your Production Apps: A Case for Developer-Driven AI
Vibe coding is great for prototypes. But your production app deserves better. He...